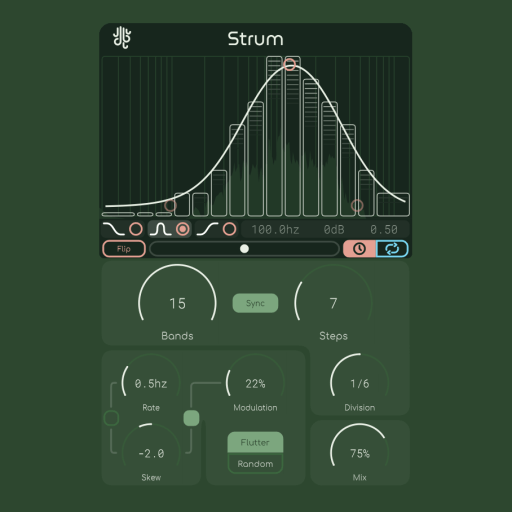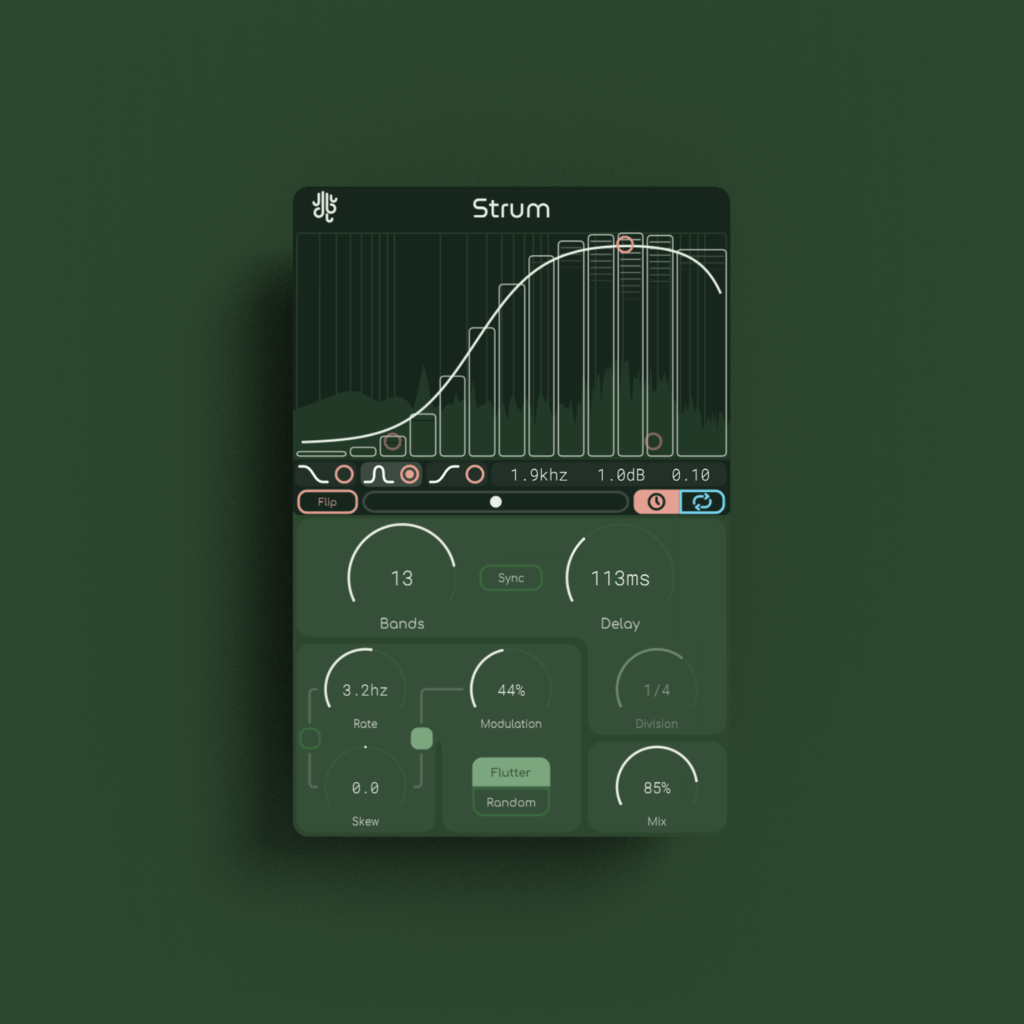
Strum is an intuitive multiband delay.
Designed to make spectral delays easier to use, Strum splits your signal evenly and cleanly into a bunch of different bands, and then allows you to control the delay time & feedback of each band.
Strum can work either in “free” or “sync” mode, where in “sync” mode each individual band’s delay time is synchronized to the tempo & time signature of your DAW, allowing for rhythmically-aware strumming.
Additionally, Strum provides a modulation panel for a bit more control of the delay times, allowing you to switch between “flutter” and “random” modes.
Highlights
Modulation Skew
Strum allows you to “skew” (or bias) the modulation based on frequency. Enabling the skew link & then adjusting the skew knob can increase / decrease the frequency / depth of your modulation as the frequency changes.
Dynamic Crossover
Strum’s multi-crossover system makes use of a proprietary filter bank which has both a flat frequency and phase response. Rest easy knowing that Strum isn’t coloring your sound at all when it doesn’t need to be.
Overlay Adjustment
Just in case the overlay that changes as the delay time & feedback are changed seems a bit too much to look at, you can go into the menu (by clicking the Lese logo) and disable it. We’ll still show you where the bands are split at, though.
Overview
Check out this video for a long look into all of Strum’s available features, set to dub techno (mostly);
What others are Saying
Strum can sound like a classic delay but its strength lies in the experimental sounds. It is capable to create sounds that are reminiscent of filtering with delay, physical modeling with strumming, and more.
Priding itself on its ability to produce more nuanced and avant-garde sounds, Strum seems to offer some truly inventive options for producers who like to think outside the box.
Copy Protection
No dongles
We don’t use any hardware dongle systems for activation, and no activation juggling is nescessary with our plugins.
Licenses are valid on up to 6 computers at once, and you can also do offline activation.
Buy it once, use it forever
We feel that any good tool should try to do it’s best to get out of your way, that’s why our plugins are not subscription based.
No need to worry about license validity here.
No tracking
Our plugins don’t collect any of your personal information.
The only times that they connect to the internet is for activation purposes, and to check for updates and news items (and you can turn these features off).
Updates
Blog posts related to Strum
Updates: Introducing AAX Support + New License Key System
We are pleased to announce that all of our plugins now support AAX. We have also updated our licensing system. AAX Support All of our...
Read MoreUpdate: Introducing Keyboard Control In All Lese Plugins
To improve the workflow in our plugins, we’ve added WASD and arrow control to our entire plugin lineup. Here’s what we’ve added. Shift + whatever...
Read MoreStrum update 1.1: Spectral Delay Mode
Our frequency-conscious delay plugin is evolving, moving beyond a multiband setup with a new Spectral Delay Mode, which opens up new possibilities of sound. Strum...
Read MoreNew Release: Strum, a “Sound Strummer” Audio Plugin
Meet Strum. Built from a desire to be able to “Strum Your Sound”, Strum is a multiband delay with a twist. The delay times &...
Read More- Optimized multiband delay network
- All-new “Dynamic Crossover” system for precise band-splitting
- Efficient delay-time modulation system with frequency-aware bias
- “Free” and “Sync” time delay modes
- Factor band control system
- Responsive visual overlay
- Vectorized, resizable interface
Windows: Supports VST3 & AAX
MacOS: Supports VST3, AU & AAX (Intel and ARM)
A Manual for Strum is included with the download package. You can also check out the Lese Knowledge Base for Strum’s manual.
Also Check Out...
(may only be loosely related, based on how many similar tags they have to Strum)